Build and design your own DIY coat rack

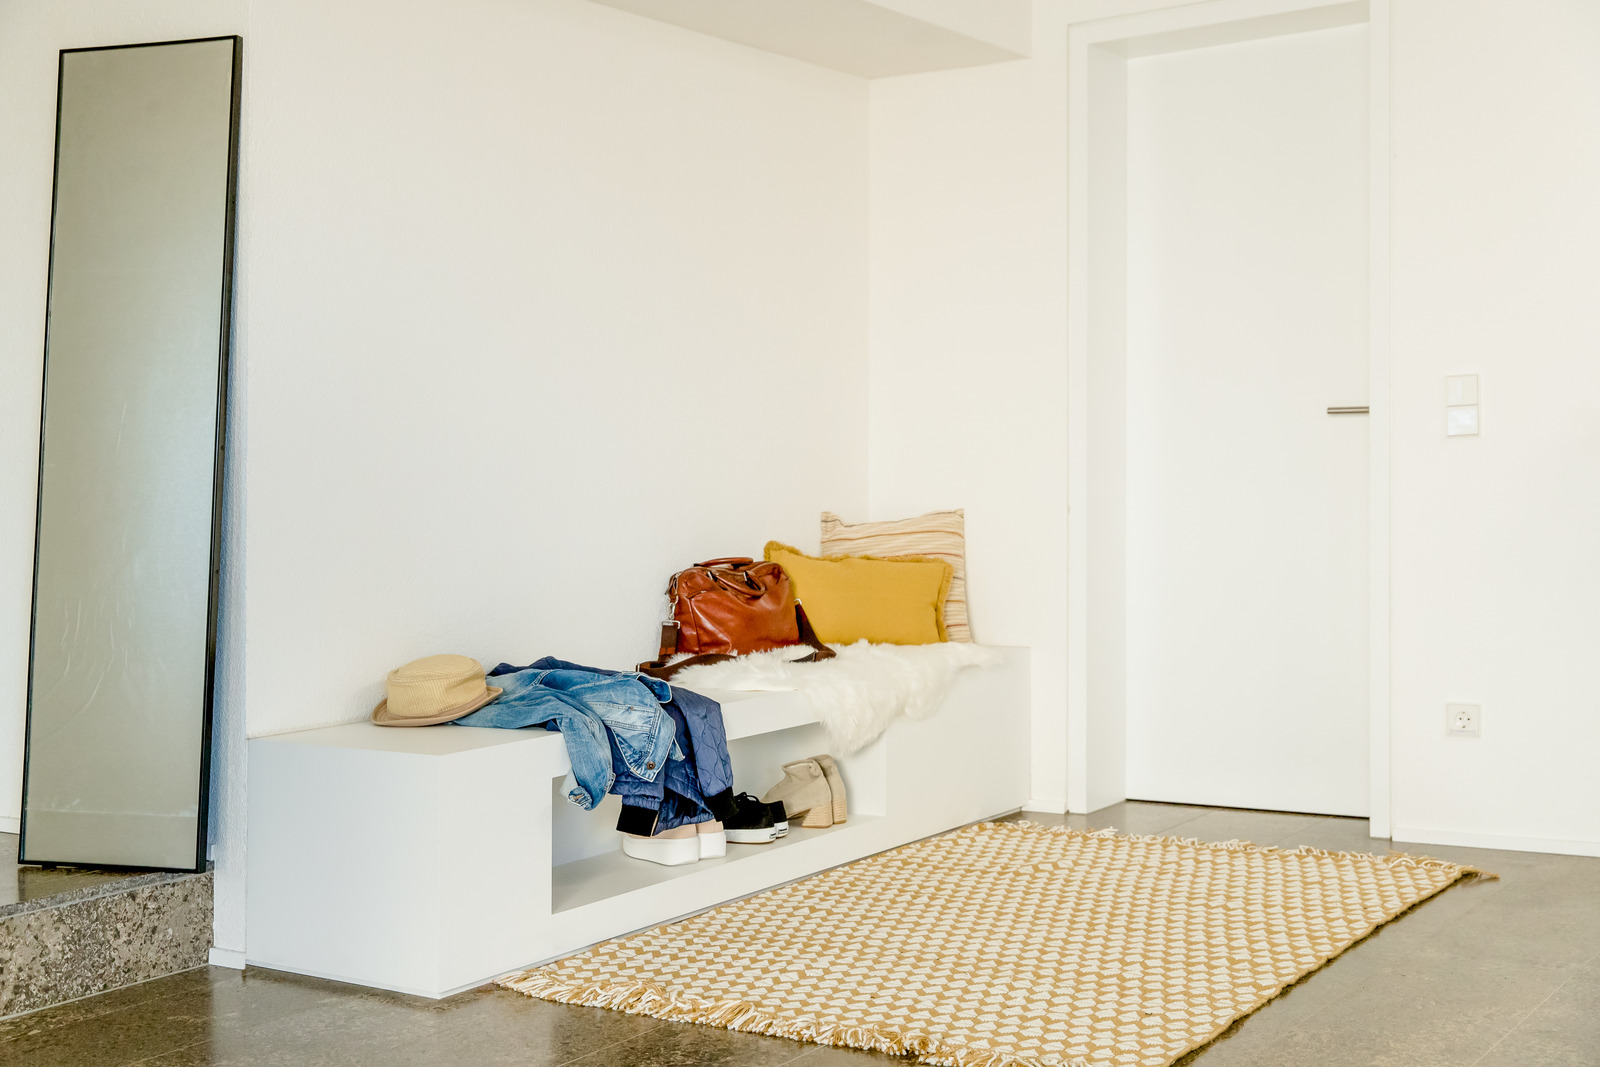
The hallway is the entrance area of every flat or house, so it is the calling card of our living situation. A practical and beautiful coat rack conveys a positive first impression just as much as a harmonious wall colour of the hallway.

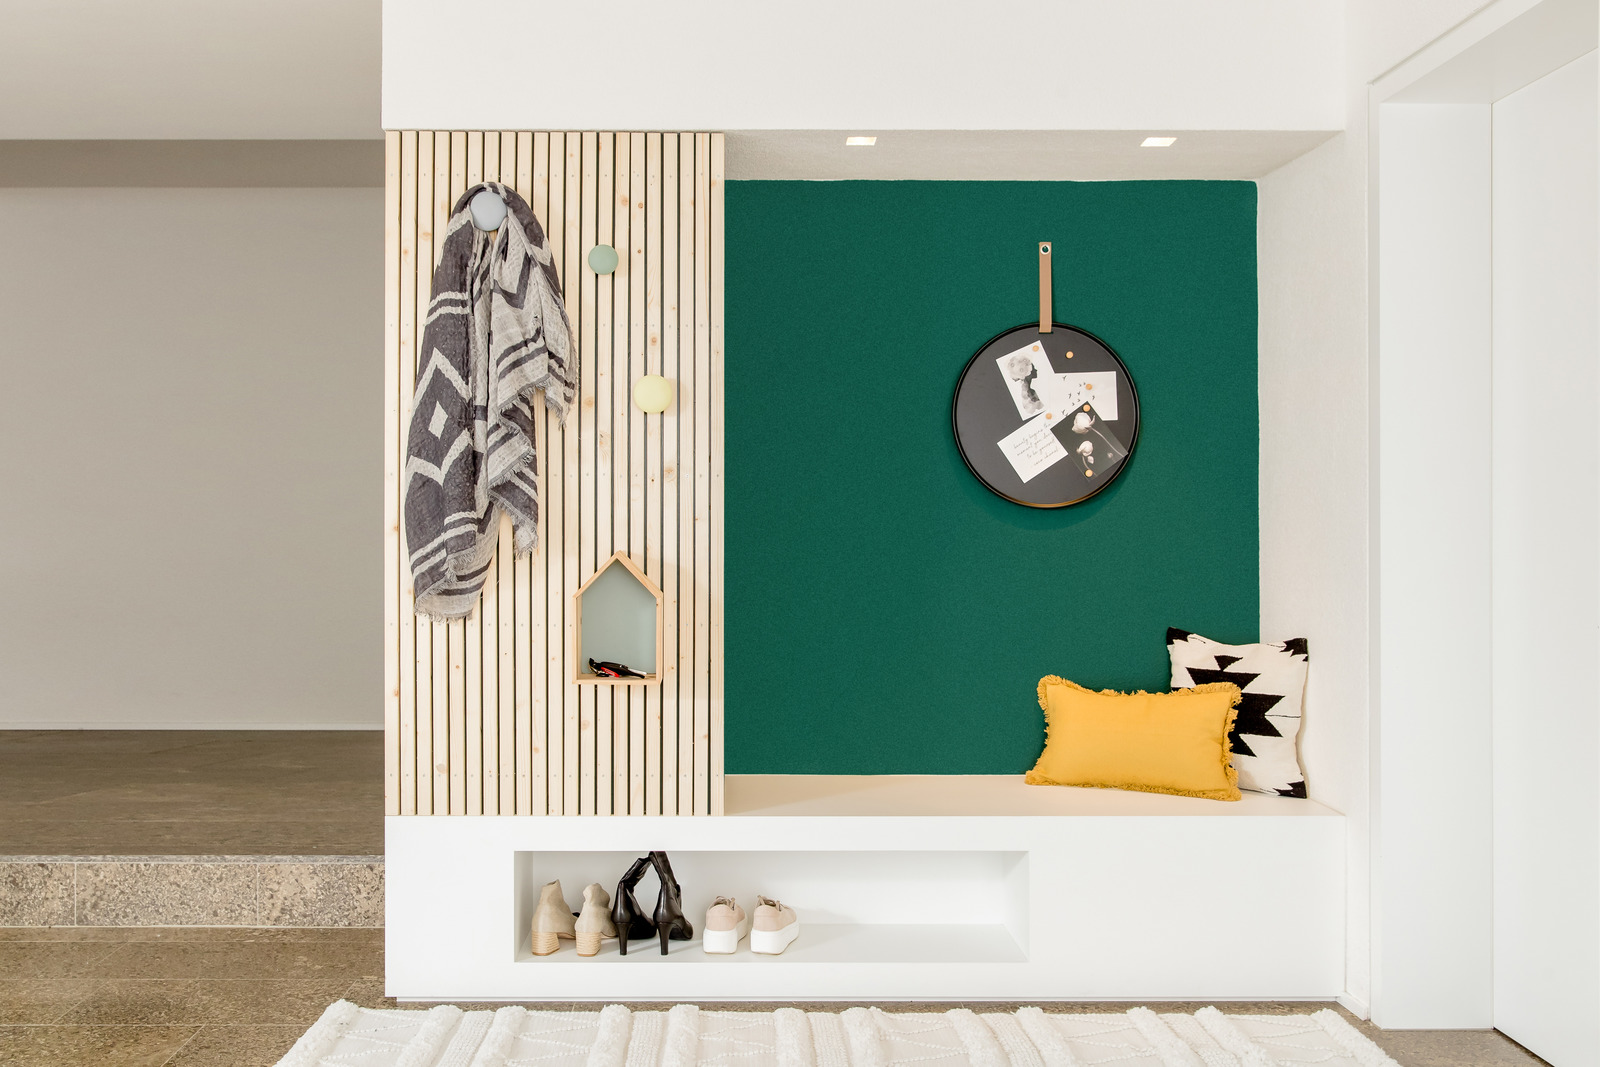
The wardrobe furniture on offer does not always suit our home or we want to get creative ourselves. For this purpose, we have created a DIY wardrobe guide together with interior designer Eva Brenner: here you will find a step-by-step description of how we build a wooden wardrobe ourselves and round off the hallway design with colour.

Jackets and other items of clothing can also be easily "hidden" behind the self-made coat rack. Decorative knobs, hooks or small shelves can then be mounted on the slatted front according to taste, so that selected favourite pieces find their place here - a beautiful and practical solution for a DIY wardrobe with a slatted look!

By viewing the video you agree that your data will be transmitted to YouTube and that you have read the privacy policy .

Which wall colour and shade are suitable for a hallway?

This question cannot be answered in general terms. If the hallway is long and narrow, light colours are usually better suited to create a friendly atmosphere. If you have more space, individual accent walls with bold colour are often a highlight.
This is also the case in our example: Eva Brenner uses a spray system and an intense colour to create a real eye-catcher in the entrance area: a DIY coat rack with wooden slats combined with a colour-coordinated wall design of the hallway in a rich, dark green. This interplay of fir green colour and rustic natural wood gives the entrance area a new cosiness. The wood grain of the slats remains uncoated, which enhances the natural character. In this way, the homemade wooden coat rack brings more openness and friendliness into the hallway.

To build the wardrobe you will need:

  • Abrasive sponge
  • • Cloth for removing dust
  • Foil, painter's fleece or cardboard for masking
  • Spacer
  • Folding ruler
  • Pencil
  • FFP2 mask
  • 1 x wooden panel as support for wooden slats
  • 1 x bottom and 1 x top panel
  • Wooden slats / wooden laths (sawn to size at the DIY store)
  • Paint
  • Wall paint
  • Metal handle as clothes rail
  • Screws
  • Coat hooks or knobs
  • 4-6 metal brackets for connecting the wooden panels (support, top and bottom panels)
  • 4-6 Wall bracket angle

A step-by-step guide: Build and design your own coat rack

Step 1: Sand the wooden panels with a sanding sponge

2021 Eva Brenner coat rack grinding 1

Lightly sand all wooden panels that are to be lacquered so that the lacquer will hold better later. Use fine sandpaper or, like Eva, a sanding sponge with a grit of at least 80. Then dust with a cloth.

Step 2: Putting the paint spraying system into operation

2021 Eva Brenner coat rack W590 ambience 2

In our example, the wooden panels are lacquered in a dark green by Eva. Use the sprayer's paint attachment for painting - you can recognise this attachment by the "fence symbol" on the front. Every material has a different viscosity - whether varnish or glaze, the "viscosity" varies. Therefore, you may have to dilute the material.

Step 3: Select the correct settings on the sprayer

2021 Eva Brenner coat rack adjusting product 1

The air and material quantity can be adjusted to the material used and your working speed. Simply try out the right adjustment by test spraying, for example on an old cardboard box. Also adjust the spraying direction on the nozzle - set the nozzle vertically if you want to spray from top to bottom and set the nozzle horizontally if you want to work from right to left.

Step 4: Painting wooden support panels for the wardrobe

2021 Eva Brenner coat rack spraying W590 1

Wear an FFP2 mask when painting and spray in thin coats at a constant distance and speed. This way you avoid paint noses and get an even paint finish. If necessary, a second coat of lacquer can be sprayed on in one pass. Once all sides have been painted, allow the wooden panels to dry well.

Step 5: Preparation for wall design

2021 Eva Brenner coat rack masking

While the wooden boards are drying, Eva designs the wall surface on which the self-made coat rack is to be mounted. She uses a wall colour in the same dark shade of green for this. Thoroughly cover and mask the floor, surrounding walls, ceilings and objects. Here we recommend painter's fleece and adhesive tape with integrated paper or foil, then it goes much faster. Stir the material well and dilute if necessary. Then pour the material into the sprayer's wall paint attachment and adjust the settings on the sprayer again.

Step 6: Spray wall with dispersion

2021 Eva Brenner coat rack spraying W590 4

You can achieve a streak-free wall painting if you work with overlapping strips of paint and pay attention to uniformity of movement and consistent spacing. If you have a heavily textured wall, we recommend coating in a criss-cross pattern: Apply wall first from top to bottom and then a second coat from left to right. It is best to remove the masking while the paint is still a little damp. This gives you a sharp edge.

Step 7: Building a coat rack from wooden slats and support plates

2021 Eva Brenner coat rack drilling 2

Now the slats are attached to the support plate. Eva uses spacers for this so that the distance between the slats remains the same. Screw on the first slat and then put on two spacers and the next slat. Hold tightly or fix with screw clamps and screw tightly as well - continue in this way with the remaining slats until the carrier plate is completely equipped with them.

2021 Eva Brenner coat rack drilling 3

Now the slats are attached to the support plate. Eva uses spacers for this so that the distance between the slats remains the same. Screw on the first slat and then put on two spacers and the next slat. Hold tightly or fix with screw clamps and screw tightly as well - continue in this way with the remaining slats until the carrier plate is completely equipped with them.

Step 8: Fasten coat rack

2021 Eva Brenner coat rack drilling 4

Screw the bottom and top panels to the support plate with 2-3 metal brackets each and mount the handle as a clothes rail. Then fix the wardrobe carcase to the wall with brackets.

Step 9: Fit hooks and knobs

2021 Eva Brenner coat rack assembling

Now the self-built wardrobe is almost finished. Eva screws matching coloured buttons to the front of the wardrobe as a way of hanging scarves or bags. To do this, first pre-drill holes and screw on the knobs. However, you can also use hooks instead of buttons. Make sure that you choose the spacing here appropriately so that you have room for all your "trinkets" and they can be easily removed or hung up

Step 10: Design your own wardrobe

2021 Eva Brenner coat rack ambience after 2

A mirror or a shelf for scarves or as a hat rack is also well suited as a practical extra to the wooden slat wall in the entrance area. You can use a cuboid shelf on the floor as a shoe cupboard for storage space and as a bench at the same time.

DIY wardrobe: The result

WAGNER Group W 590 Produktbild

W 590 FLEXiO

The flexible paint sprayer for interior and exterior use

Go to product
Tips and tricks with Carina

Tips and tricks with Carina

We have summarised more tips on spraying wood and metal paints for you in our Tips and Tricks with Carina.

Apply glazes and lacquers correctly
Spraying woodstain: Guide & tips

Spraying woodstain: Guide & tips

Learn the best way to spray woodstain, what you should look out for, why it's worth spraying stains and what the best equipment is for it.

Spraying varnishes
Dipl.-Ing. for Interior Design


With this self-made coat rack made of natural wood slats in combination with the coloured wall design in dark green, we have completely redesigned the entrance area! This coat rack leaves plenty of room for creativity: for example, bowls or a little house for keys and other small items can be attached to the wooden slats!"

Eva Brenner

Dipl.-Ing. for Interior Design