Retro style space-saving clothes airer

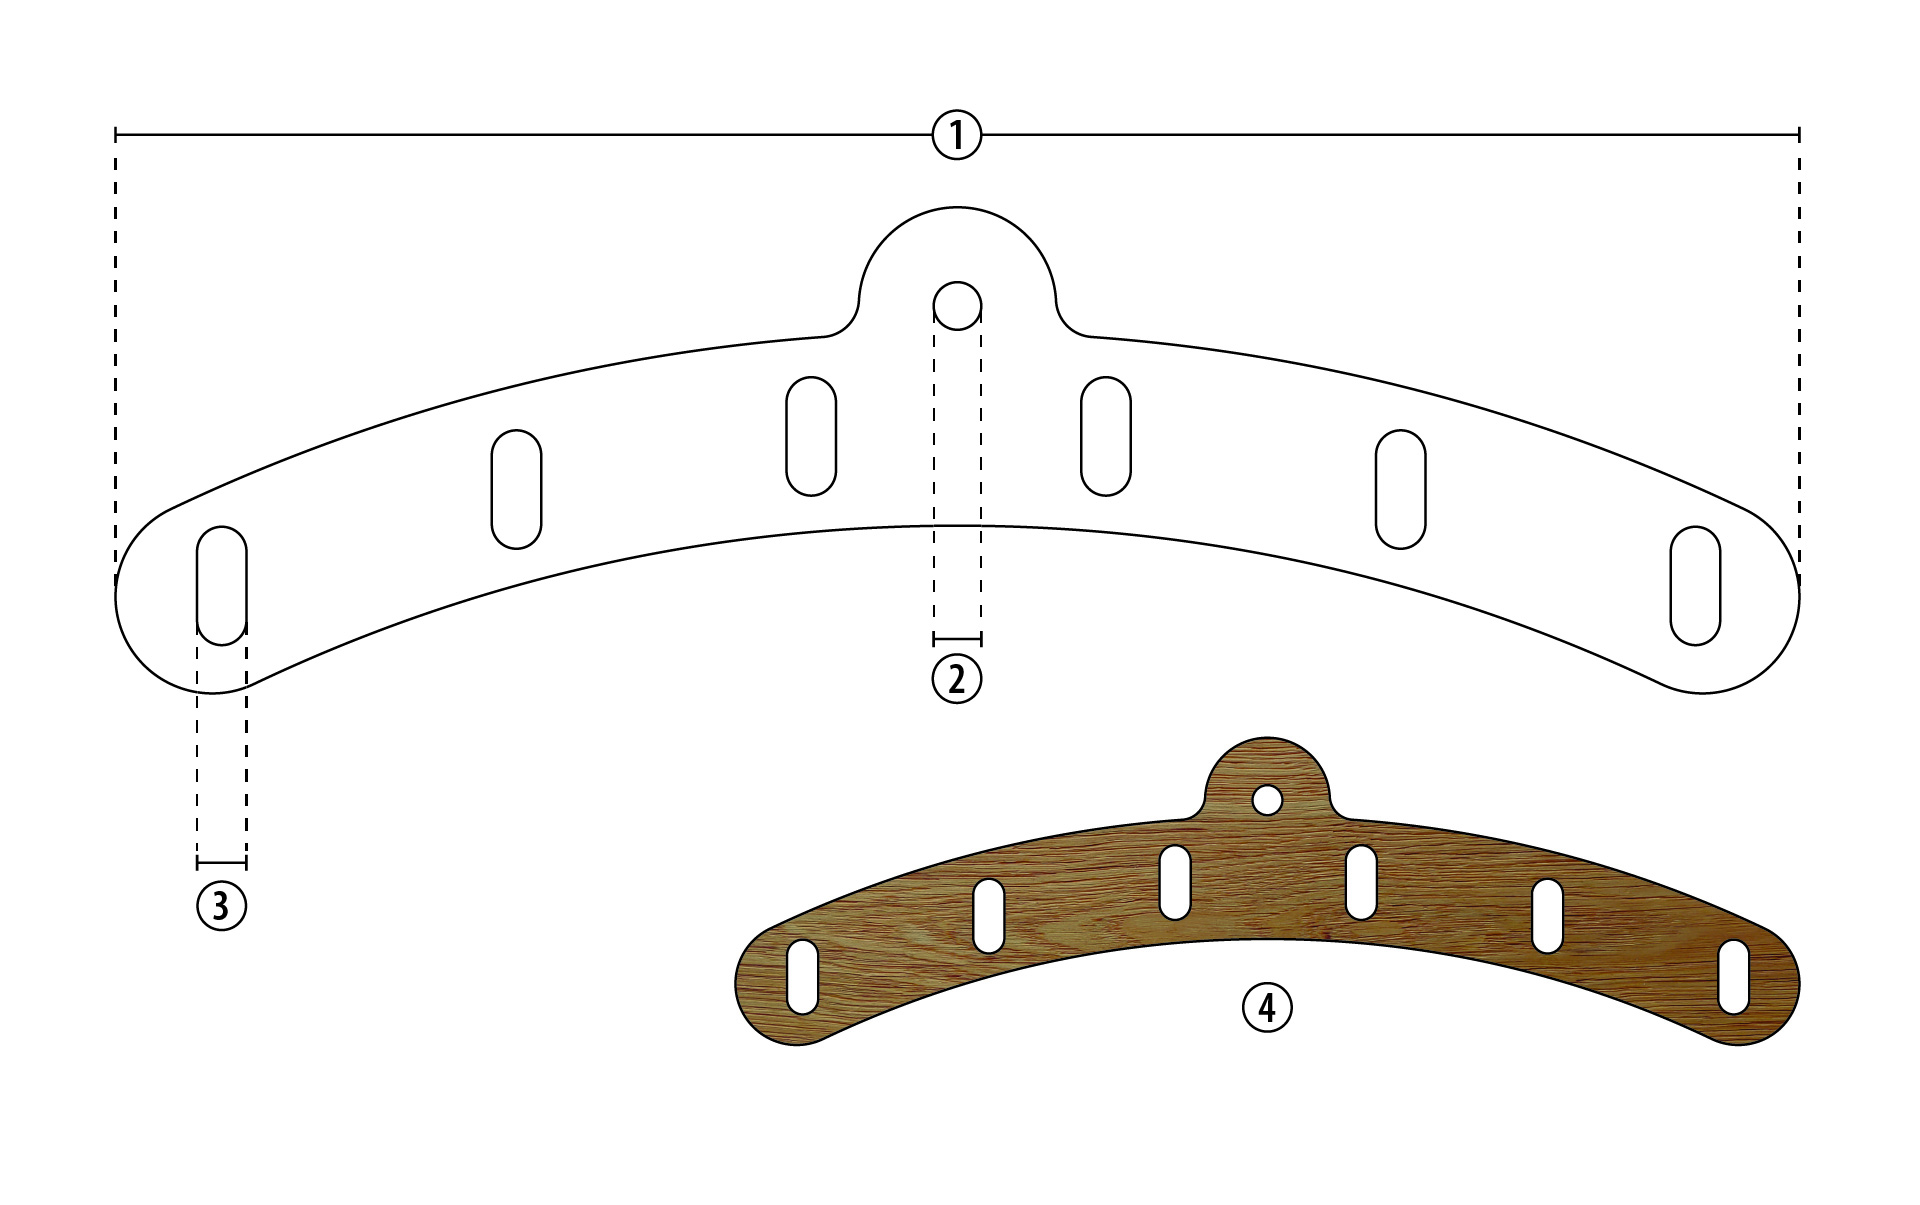
Do you want to make your own space-saving ceiling-mounted clothes airer? And ideally also use existing items from your household, so a real upcycling project? Nothing could be easier! In this DIY tutorial, we show step by step how to make an adjustable clothes airer for the ceiling from two cast iron clothes rack ends or a homemade holder, four wooden rails, a rope and pulley wheels, which can be used as a height-adjustable clothes rail.

By viewing the video you agree that your data will be transmitted to YouTube and that you have read the privacy policy .

You will need:

  • 2 x approx. 35 cm wide cast iron vintage rack ends or homemade holder made of wood
  • 1 x single screw pulley
  • 1 x double screw pulley
  • approx. 10 m durable jute rope
  • 1 x fixing hook with screws and wall plugs
  • 4 x wooden rails or slats the desired length
  • Undercoat and top coat in the desired colour

Tip: You can buy the individual components and rebuild them using the instructions. However, we recommend that you first check what you still have at home and can use. This saves money and resources. In our example, two old cast-iron rack ends from an antique shop were used – but you can also make the bracket for the ceiling clothes airer yourself – see the sketch. The wooden railing were also left over from another project and could be used for the DIY project “ceiling clothes airer”.

1
2
3
4

Step 1 of 6: Preparation for the construction of the ceiling clothes airer

Step 1: Preparation for the construction of the ceiling clothes airer

Good preparation is the key to a successful outcome. Place the wooden slats and the bracket on a covered work table outside or in your garage and sand them on all sides so that the paint will adhere. Make sure that there are no rough surfaces left so that the clothes you want to dry later on the clothes airer do not snag.

Then dust thoroughly and clean off any other dirt.

Step 2 of 6: Preparation for painting with a fine spray system

Step 2: Preparation for painting with a fine spray system

To achieve the best result, first apply a undercoat and then one or two coats of top coat. Stir the primer and the chosen paint thoroughly – the larger and heavier particles of the materials will settle to the bottom of the paint after only a short time. This is easy with the stirring stick supplied in the WAGNER paint sprayer and you can also use it for diluting the paint if it is too thick. Follow the recommendations of the paint manufacturer – each notch on the WAGNER stirring stick corresponds to a dilution of 10 %. Fill the spray attachment ¾ full with the undercoat or top coat, screw it on tightly and click the attachment onto the sprayer.

Tip: Wear a respirator to protect yourself from the sanding dust and paint mist. If desired, work gloves and safety goggles are also useful aids.

Step 3 of 6: Painting the space-saving clothes airer and rails

Step  3: Painting the space-saving clothes airer and rails

Carry out a spray test on a piece of old cardboard, for example, before spraying on the wooden rails and the bracket. If the spray pattern is not good, you can adjust the settings on the paint sprayer again or dilute the material further – tips on these subjects can be found on our page on how to apply glazes and lacquers correctly.

Now it’s time to paint the clothes airer: Always spray at an even speed at a distance of approx. 15 cm from the surface. Release the trigger as soon as you have reached the end of the wooden rail. Allow the undercoat of the clothes airer to dry according to the paint manufacturer’s instructions and apply another coat of undercoat if necessary. When this has dried, fill the paint container with the paint to apply the top coat.

Step 4 of 6: Attach the ceiling pulleys of the clothes airer and the fastening hook

Step 4: Attach the ceiling pulleys of the clothes airer and the fastening hook

First decide where the first pulley should be placed. Make sure to keep a sufficient minimum distance to the adjacent wall so that the rack of the clothes airer can be raised and lowered freely.

Check that there are no water pipes or electric cables in the chosen location. Mark the position with a pencil, then drill a pilot hole and screw in the double pulley. Then measure the distance to the next pulley – according to the length of your wooden rails and the frame of the clothes airer – and drill and screw the single pulley in place.

Attach the cleat hook to the adjacent wall under the double pulley rope – at a height of approx. 150 cm from the floor so that you can reach it easily.

Step 5 of 6: Installing the clothes airer on the ceiling

Step 5: Installing the clothes airer on the ceiling

It’s almost done: Thread the jute rope (A) through the single pulley (1) and then through the right wheel of the double pulley (2). Then pass the jute rope through the left pulley from behind and leave one loop (D). Attach the rope ends (of A and B) to the two rack ends. Pull both frame ends of the clothes airer up to the ceiling and tie a knot in the rope (C). Then lower the airer and tie more knots about 40 cm apart.

Now the wooden rails can be pushed into the rack ends one after the other and the ceiling mounted clothes airer or clothes rail is ready for use.

Step 6 of 6: Space-saving clothes airer and clothes rail in one

Step 6: Space-saving clothes airer and clothes rail in one

Now it’s time to use the new clothes airer. Simply lower the clothes airer to a comfortable working height and hang the freshly washed clothes to dry. Then pull the clothes airer up to the ceiling, attach the rope to the cleat hook on the wall and use the rising warm room air to dry them. Alternatively, you can use the clothes airer as a clothes rail to store your jackets, trousers and other clothing.

The practical solution is ready: a homemade, space-saving ceiling clothes airer and at the same time a clothes rail to dry and store your clothes. This stylish, traditional retro-style clothes airer maximises the available space in your room and can become your new highlight and favourite little helper in the household.

The result

icons8 information

Why it’s worth making your own space-saving ceiling clothes airer?

This type of ceiling-mounted clothes airer dates from the late eighteenth century and was typically used in European laundry rooms of large houses or estates: so it’s a real retro piece. With the help of the pulley system, the clothes airer is lowered from the ceiling so that it is easy to load or remove the clothes. To dry the laundry or when not in use, the clothes airer is then raised to the ceiling. So you have a space-saving clothes airer that is no longer in the way. But a clothes airer on the ceiling also makes use of an important law of physics: Warm air always rises, i.e. near the ceiling, damp laundry dries even faster when in the warmer air. The ideal turbo ceiling dryer.

A big advantage of DIY is, of course, that the ceiling clothes airer can be adapted to the individual colour scheme and space available – you decide how long and wide the clothes airer will be and what colour it should be! Building your own ceiling-mounted clothes airer is therefore not only very space-saving, ergonomic and practical, but also extremely effective for drying laundry quickly or storing clothes easily.

Wood&Metal Sprayer W 100

Wood&Metal Sprayer W 100

The handy solution for small and medium projects

Wood&Metal Sprayer W 100
Spraying varnishes: Instructions & tips

Spraying varnishes: Instructions & tips

Find out here how best to proceed when spraying varnish, what you should bear in mind, why it is worth spraying varnish and which equipment is suitable for this.

Spraying varnishes
Tips and Tricks with Carina

Tips and Tricks with Carina

We have summarised more tips on spraying lacquers and varnishes for you in our Tips and Tricks with Carina.

Apply glazes and lacquers correctly