Repainting kitchen tiles

Kitchen renovation made easy

Don't fancy hacking off old tiles while choking on plumes of dust – or facing a huge bill to renovate your kitchen? Then here's the perfect solution: simply repaint your old tiles to add some new flair and colour to your kitchen. Cheap, fast, clean and simple!

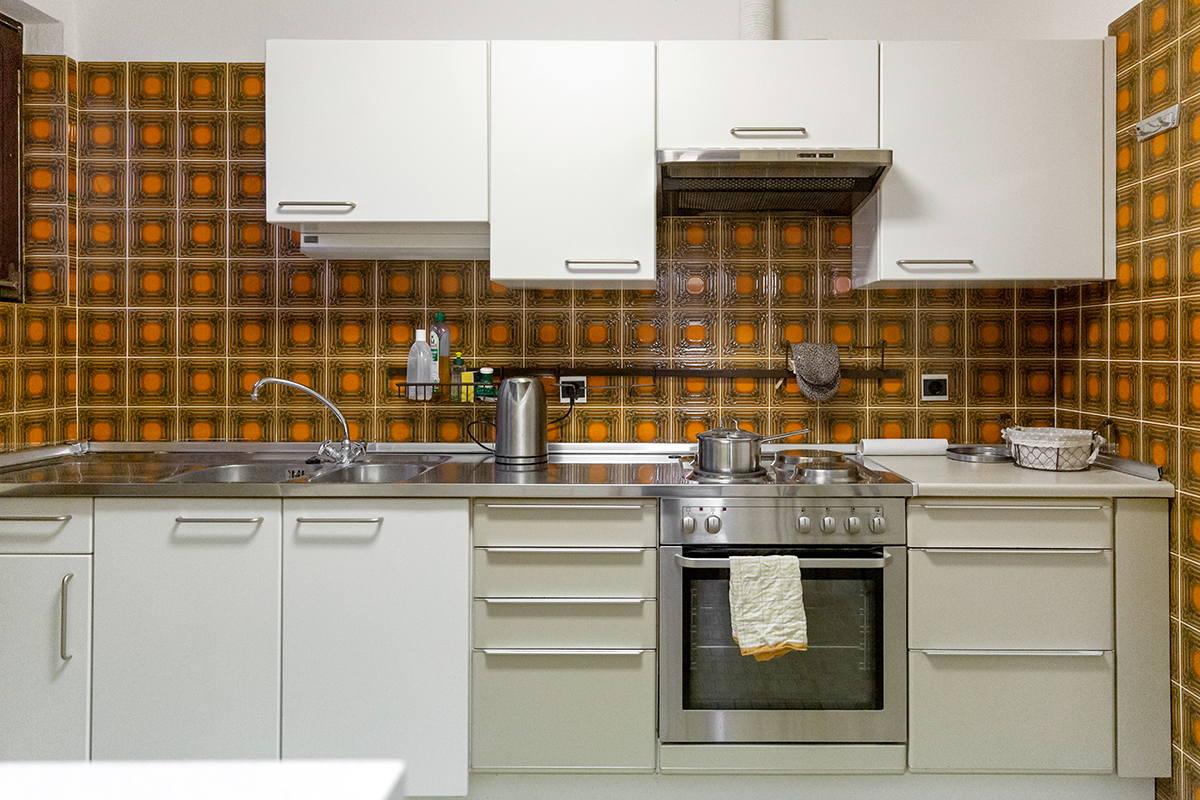
Anna is preparing to move into her new home. However, since her new apartment is in an old building, some updating is in order. The kitchen furniture is still okay, but the old tiles (brown and orange) make the room look very dark and small. Anna researches the various options and decides to repaint the old tiles. As she wants to create a more stylish and modern look, she chooses a fresh pastel green as the paint colour. She gets her good friend Pierre to help her – as a professional painter he should know what to do! What's the best way to repaint the old tiles to ensure even results and avoid application marks? For Pierre, the answer is clear – using a paint spray system he can apply the tile paint evenly and also ensure a suitable coating thickness. Sounds complicated, but it's really not!

By viewing the video you agree that your data will be transmitted to YouTube and that you have read the privacy policy .

You will need:

  • Cleaning cloth, sponge
  • A screwdriver, spatula and stirring rod
  • Tile paint + tile sealant, e.g. from Jäger Lacke
  • Tile cleaner, methylated spirit
  • Masking material, protective equipment such as gloves and a face mask

Step-by-step instructions for painting tiles

Step 1 of 5: Mask off and disassemble the kitchen furniture

Mask off and disassemble the kitchen furniture

Pierre covers the kitchen base units with protective film and masking tape. He removes items that are not to be painted, including the wall units and masks sockets and light switches.

Mask off and disassemble the kitchen furniture

Pierre covers the kitchen base units with protective film and masking tape. He removes items that are not to be painted, including the wall units and masks sockets and light switches.

Step 2 of 5: Clean and prepare the tiles

Clean and prepare the tiles

In order for the tile paint to adhere properly, both the paint and the kitchen must be kept at a temperature of at least 22°C and the tiles must be thoroughly cleaned to remove all dirt. Pierre first removes any adhesive and silicone residues with a spatula and then cleans the surfaces with a cloth soaked in methylated spirit. The old joints and tiles must also be intact. If there are any broken areas or cracks, fill them in beforehand with waterproof grout or filler. Don't forget to sand down the filler once it is dry. Next, Pierre uses a tile cleaner to clean the whole surface and remove any limescale and dirt. The tiles are then rinsed with water. As soon as they are dry, Pierre wipes down the entire surface again with a cloth to remove any dust. Take care to remove all sources of dust – to avoid dust blowing around.

Step 3 of 5: Prepare the spray unit and tile paint

Prepare the spray unit and tile paint

Pierre is using a 3-in-1 water-based tile paint for the kitchen renovation project. It contains the primer, topcoat and sealant. He stirs the paint, dilutes it with 10% water and pours it into the spray attachment.

Prepare the spray unit and tile paint

Pierre is using a 3-in-1 water-based tile paint for the kitchen renovation project. It contains the primer, topcoat and sealant. He stirs the paint, dilutes it with 10% water and pours it into the spray attachment.

Prepare the spray unit and tile paint

Pierre is using a 3-in-1 water-based tile paint for the kitchen renovation project. It contains the primer, topcoat and sealant. He stirs the paint, dilutes it with 10% water and pours it into the spray attachment.

Step 4 of 5: Painting tiles

Painting tiles

Now comes the fun part – spraying the tile paint. Pierre sprays at an even pace and distance of approx. 3 – 10 cm parallel to the tiled surface. Anna also has a go – she tries painting with the sprayer and is surprised by how easy it is. Next time, she'll do it herself! Now the paint needs to dry and harden – the new tile coating is dry to the touch after just 30 minutes. If a second coat or further sealing is necessary, this can be done after a drying time of 4 – 5 hours.

Step 5 of 5: Seal the tiled area

Seal the tiled area

The tiles behind the stove are frequently exposed to hot steam and liquid splashes. In particular, fat from the frying pan quickly settles in the joints and on the tiles. For this reason, 5 hours later Pierre applies an additional, special sealant in this area, once again in a cross-coat pattern. Before doing this, he cleans the spray attachment, thoroughly masks off the area he wants to seal, mixes a hardener with a wet-room sealant and refills the spray attachment. The whole thing must now be allowed to fully dry and harden - it's best to avoid splashes of water or grease on the newly coated tiles for the next 5 days. Afterwards, the tiles will be ready for normal use again.

The result

The results exceed Anna's expectations – she thinks it looks great! Within a day she has a renovated kitchen including newly painted tiles in her favourite colour. And she has avoided the annoying dust, high costs and prolonged inconvenience of a full renovation. It's nice to have friends like Pierre who know precisely how to do it. And the next time tiles need to be painted, Anna wants to have a go by herself.

More projects