Building a room divider yourself

Building your own room divider sounds like a big and complicated endeavour. But it’s actually not hard at all! We've put together a step-by-step guide for you along with a detailed list of all the materials you’ll need. Then nothing can go wrong!

You will need:

  • Cordless screwdriver
  • HSS drill,
  • cone or comet countersink
  • Metal saw.
  • Folding rule or a tape measure,
  • double-sided adhesive tape
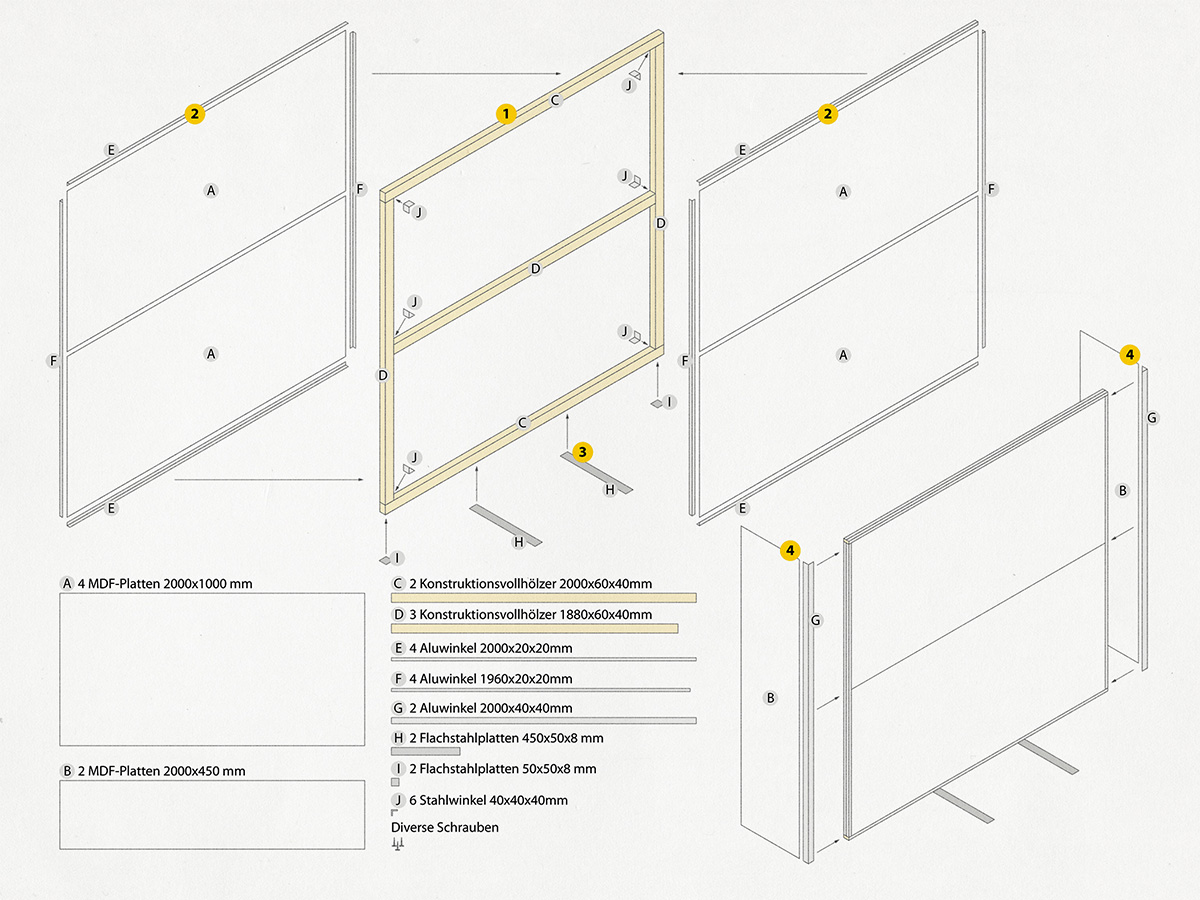
  • 4 MDF panels 8 mm (2000 x 1000 mm)
  • 2 MDF panels 8 mm (2000 x 450 mm)
  • 2 solid spruce battens (2000 x 60 x 40 mm)
  • 3 solid spruce battens (1880 x 60 x 40 mm)
  • 4 aluminium brackets (2000 x 20 x 20 mm)
  • 4 aluminium brackets (1960 x 20 x 20 mm)
  • 2 aluminium brackets (2000 x 40 x 40 mm)
  • 2 flat steel panels for the feet (450 x 50 x 8 mm)
  • 2 flat steel panels for the feet (50 x 50 x 8 mm)
  • 6 steel brackets (40 x 40 x 40 mm)
  • Miscellaneous screws

Build the room divider completely by yourself in 8 steps

IMG 6361 entwickelt

Step 1: Saw 2 of the construction solid spruce battens to a length of 2000 mm and the other 3 battens to a length of 1880 mm, resulting in a square of 2 by 2 metres. One of the three shorter battens will later serve as a crossbeam. Cut 4 aluminium brackets to a length of 2000 mm and 4 aluminium brackets to a length of 1960 mm. Use a metal saw for this or have the brackets cut to size at the DIY store. Also allow enough time for the saw blade to cool down again.

IMG 6431 entwickelt

Step 2: Now drill 5-6 holes in your aluminium brackets at a distance of about 20 to 30 cm. It is best to use an HSS drill suitable for aluminium and flat steel. To also countersink the screws so that the screw head does not protrude, lower the holes you have just drilled. To do this, measure the diameter of the screw head and select an appropriate comet or taper countersink. Lower at a low speed so that the countersink does not heat up too much and no chatter marks appear in the countersink pattern. Also use it to deburr the previously very sharp-edged hole.
Caution: Two aluminium brackets measuring 2000 x 40 x 40 mm will be glued on later as corner protection. These do not need to be drilled.

IMG 6430 entwickelt

Step 3: Now focus on the flat steel. Drill a hole here, about 2.5 cm from the edge. Here, too, you should use an HSS drill, because the flat steel is a bit harder than the aluminium. Countersink the holes here too with the comet or taper countersink for a burr-free hole and a flush finish for the screws.
Tip: Ideally, use a centre punch before drilling. Use this to make a small indentation in the metal where you can place the drill - this will prevent it from slipping and you will drill the hole exactly where you want it.

IMG 6385 entwickelt

Step 4: Now screw the sawn solid construction timber together with the steel brackets to form a frame. Screw the crossbar to the sides at a height of one metre using brackets.

IMG 6418 entwickelt

Step 5: Place the MDF panels on the frame. Now pick up your aluminium bracket and screw the panel all the way round onto the frame.

IMG 6511 entwickelt

Step 6: Screw the flat steel panels onto the underside of the frame - in the centre at a distance of around 40 - 50 cm. The small panels are attached at the outer edges.

IMG 6549 entwickelt

Step 7: Now place the finished modules upright and screw the MDF side pieces on.

IMG 6567 entwickelt

Step 8: Now glue two aluminium brackets measuring 40 x 40 mm onto the corners as corner protector using double-sided adhesive tape or industrial-strength glue.

What should you look out for when building a room divider yourself?

Prepare the project well in advance!

Check what materials and tools you still have and where supplies are needed. For example, also check the battery of the cordless screwdriver and charge it in advance. Do you have enough screws? Make sure you have everything ready and working when you want to start working - so there are no unwanted interruptions.

Work calmly and with care

As in any DIY or building project, it is important not to lose sight of the details in the creative flow. The frame of the room divider is the base and guarantees stability. It would be annoying, in the anticipation of screwing and shaping, to saw the timbers incorrectly because of a careless mistake. If the screen cannot be assembled, it would be a shame to waste the time and materials! So it's better to measure twice - or have your posts cut to size at the DIY store.

Ensure sufficient stability

Especially if you want to decorate your room divider for the home office and there is some weight hanging on one side, you might want to increase the footprint of the screen. Wider furniture feet, for example, or simply square wooden plates that you screw under the feet, can help here.

2021 Wager EvaBrenner 12

Designing room dividers

Need some inspiration? Eva Brenner shows how you can design not only the home office but also your dining room in a modern and elegant way.

To the project