Custom Window Boxes

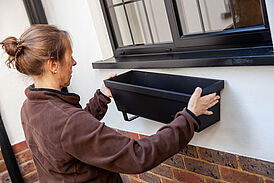
Window boxes are great for displaying flowers and plants. As they are made from wood or metal they can be given a custom paint finish to match your windows and to protect them from the elements.

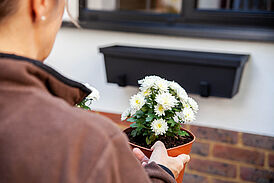
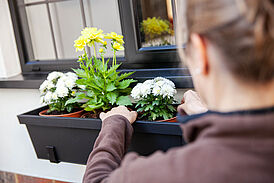
These aluminium window boxes have been neglected so they need to be painted. Using a brush or roller would be difficult to get into all the corners and edges and achieve a smooth application of paint without visible brush or roller marks. Using a paint sprayer speeds up the application time and achieves a factory finish, making them look like new again. Once you have added some fresh flowers or plants, the window boxes will brighten up your house or apartment windows and add real curb appeal.

We will show you all the required steps to get the custom paint job done.

By viewing the video you agree that your data will be transmitted to YouTube and that you have read the privacy policy .

Step 7: Ready for top coat

Step 7: Ready for top coat

Once you have completed the primer coat, return any of the unused primer to the original tin and clean out the spray paint container. Then fill the spray attachment with the black top coat after preparing the paint as before.

Allow the paint to dry following the paint manufacturer’s instructions. As it is so fast to apply more coats of paint, if required, apply another top coat to give the surface ultimate protection.

Step 8: Cleaning

Cleaning

Clean the spray attachment thoroughly with water or solvent after use. To do so, unscrew all parts and clean them in a basin by hand or using a sponge.

The result

Now the project is complete and it is time to add your favourite flowers or plants and admire your newly customised spray painted window boxes. If you want to bring even more greenery into your garden, you can build a wooden trellis yourself to complement the flower box and attach it to the outside wall.

Window flower box W590 5D  325  LowRes

Window flower box W590 5D  336  LowRes

Window flower box W590 5D  302  LowRes

Window flower box W590 5D  325  LowRes
Window flower box W590 5D  336  LowRes
Window flower box W590 5D  302  LowRes

Now align the suction tube depending on how you are going to work - forwards if you want to spray downwards and backwards if you want to spray objects overhead. Now screw the spray attachment onto the container.

The spray jet can be adjusted three ways so that you can adapt it perfectly to your way of working and projects. Always perform a test spray on a piece of cardboard first so that you can find the ideal settings for you.

You will need:

  • Soft bristle brush
  • Sponge
  • Cleaning bucket
  • Sandpaper
  • Microfibre cloth
  • Dust mask
  • Protective glasses
  • Gloves
  • Primer undercoat
  • Metal paint

Window Box Custom Spray Painting Guide

Step 1: Cleaning the surface

Step 1: Cleaning the surface

Start by cleaning the window boxes by first brushing off any dirt or debris. Using washing up liquid and warm water, wash the window boxes with a sponge then rinse with cold water and leave to dry.

Step 2: Protect yourself

Step 2: Protect yourself

Always wear the appropriate PPE, we would recommend a dust mask, glasses and gloves.

Tip: you can also use your Wagner sprayer to remove the dust from the surface of the window boxes just by using an empty spray attachment, so the air blows the dust away.

Step 3: Sand down the Window Boxes

Step 3: Sand down the Window Boxes

Sand down the surface of the window boxes to remove any loose or flaky paint using either an electric sander or sandpaper. This flattens the surface, removes old loose paint, and gives a key for the new paint to adhere to. Now wipe off any dust using a dust cloth.

Step 4: Preparing the window box paint and primer ready for spraying

Step 4:Preparing the window box paint and primer ready for spraying

Open the paint tins and give them a good stir with the included stirring stick. The paint should run smoothly from the end of the stirrer and immediately dissolve into the paint or primer without leaving a trail on the surface. If a trail is visible you will need to dilute the paint. Follow the manufacturer’s instructions for the liquid to dilute the paint. Each notch on the stirrer corresponds to a 10% dilution. Add the appropriate liquid and mix again testing again for trails. Repeat the process if needed then fill the spray paint container with material.

Now align the suction tube depending on how you are going to work - forwards if you want to spray downwards and backwards if you want to spray objects overhead. Now screw the spray attachment onto the container.

The spray jet can be adjusted three ways so that you can adapt it perfectly to your way of working and projects. Always perform a test spray on a piece of cardboard first so that you can find the ideal settings for you.

Step 5: Test spray onto cardboard

Step 5: Test spray onto cardboard

To check your spray pattern, perform a test spray onto a scrap of cardboard to find the right settings for you and to get the spray pattern just right. Start with the lowest paint flow setting and gradually increase it to your desired paint flow. The spray pattern should have soft edges – if you see large blobs of paint or irregular splattering then continue to mix or dilute further. Keeping the paint warm will help improve the performance (eg keep the paint inside before use).

Step 6: Surface protection

Step 6: Surface protection

Lay down dust sheets on a suitable surface so you can start spraying the window box. Here we are working in the garden. If you put the window boxes on blocks or old bricks to raise them slightly it is easier to spray all the way to the bottom. Turn the window box upside down and using the horizontal spray setting, spray primer onto the bottom of the window box. Then spray the sides using the vertical spray setting. After they have dried, turn the window box over and spray the inside using the detailed precise spray setting to get into the corners and edges.

Tip: Always press the trigger about 10 cm before the edge of the window box so you are already moving when you start to spray. Keep the gun moving at a steady pace, holding it about 15 cm from the surface. When you have passed the edge of the window boxes release the trigger and change direction. This avoids a build-up of thicker layers of paint during direction changes at the end of each pass.

W 590 FLEXiO

W 590 FLEXiO

The flexible hand spray gun for indoor and outdoor use. The unit can be used with almost all types of wood and metal paints, stains and varnish.

W 590 FLEXiO
Spraying woodstain: Guide & tips

Spraying woodstain: Guide & tips

Learn the best way to spray woodstain, what you should look out for, why it's worth spraying stains and what the best equipment is for it.

Spraying varnishes
Why spraying is better

Why spraying is better

With a paint sprayer, it’s incredibly easy to apply the material evenly and to cover the entire surface. The end result is a smooth and even layer of paint. When using a brush, brush marks tend to appear.

Why it's better to spray