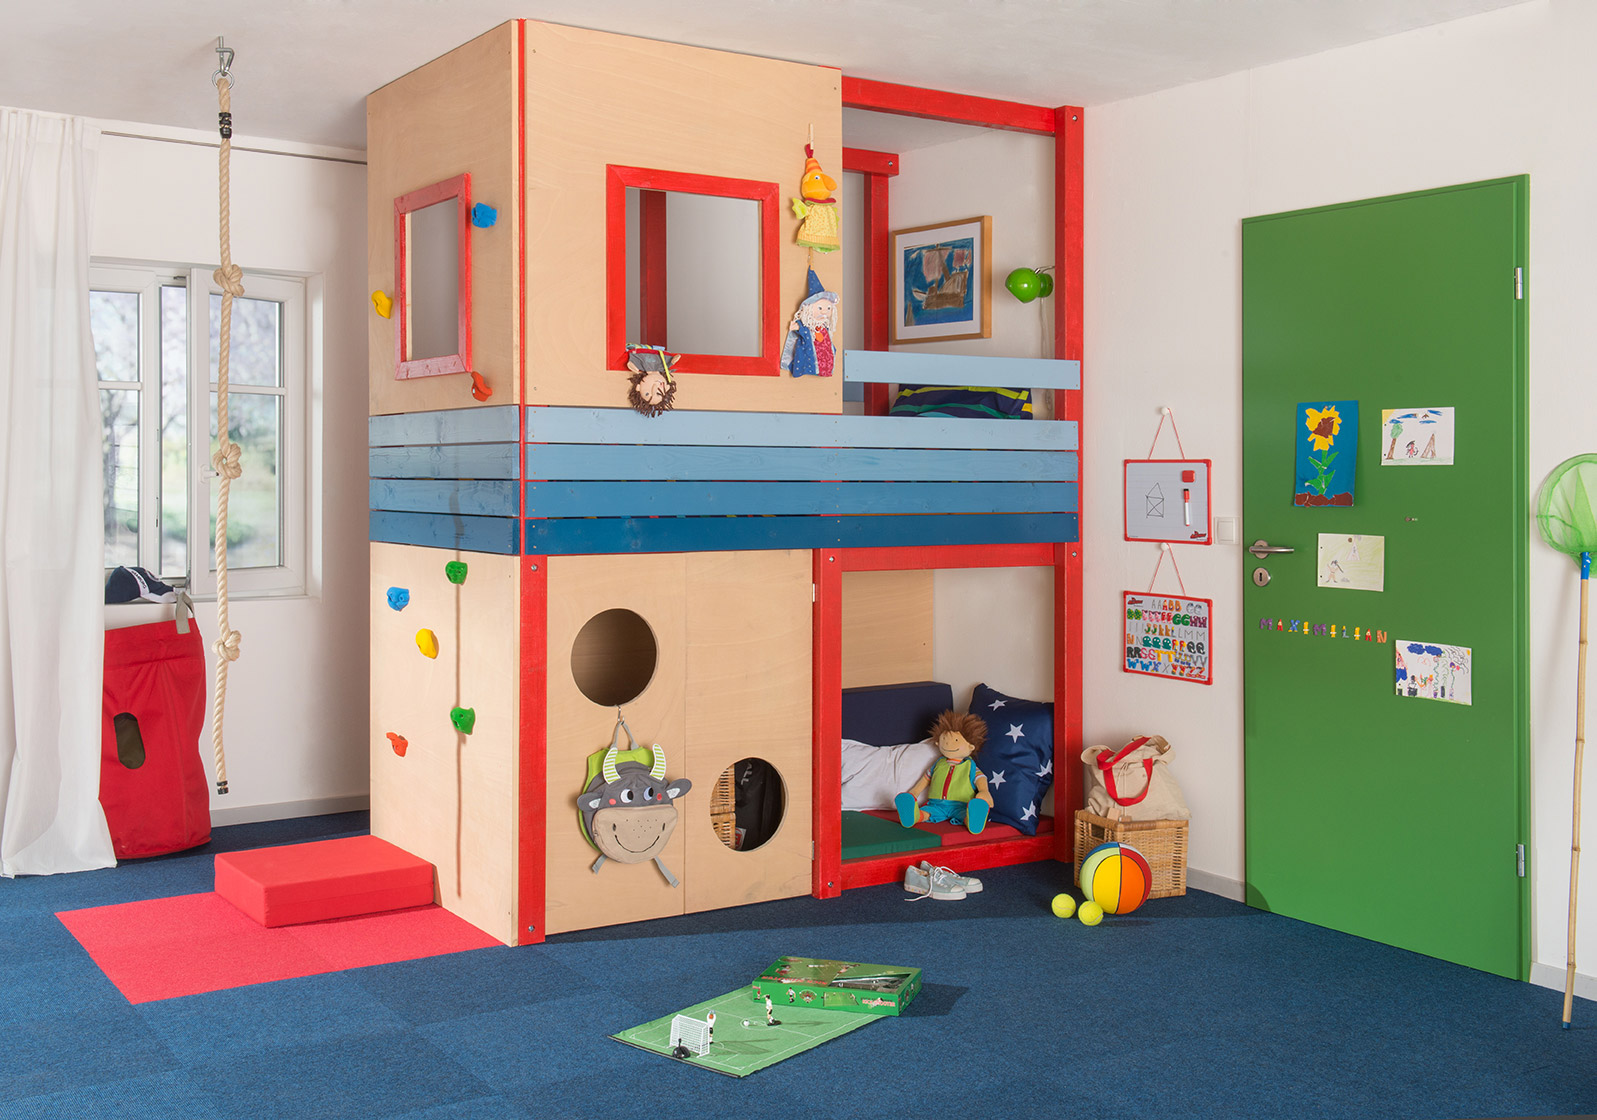
Guide to building a children's bunk bed

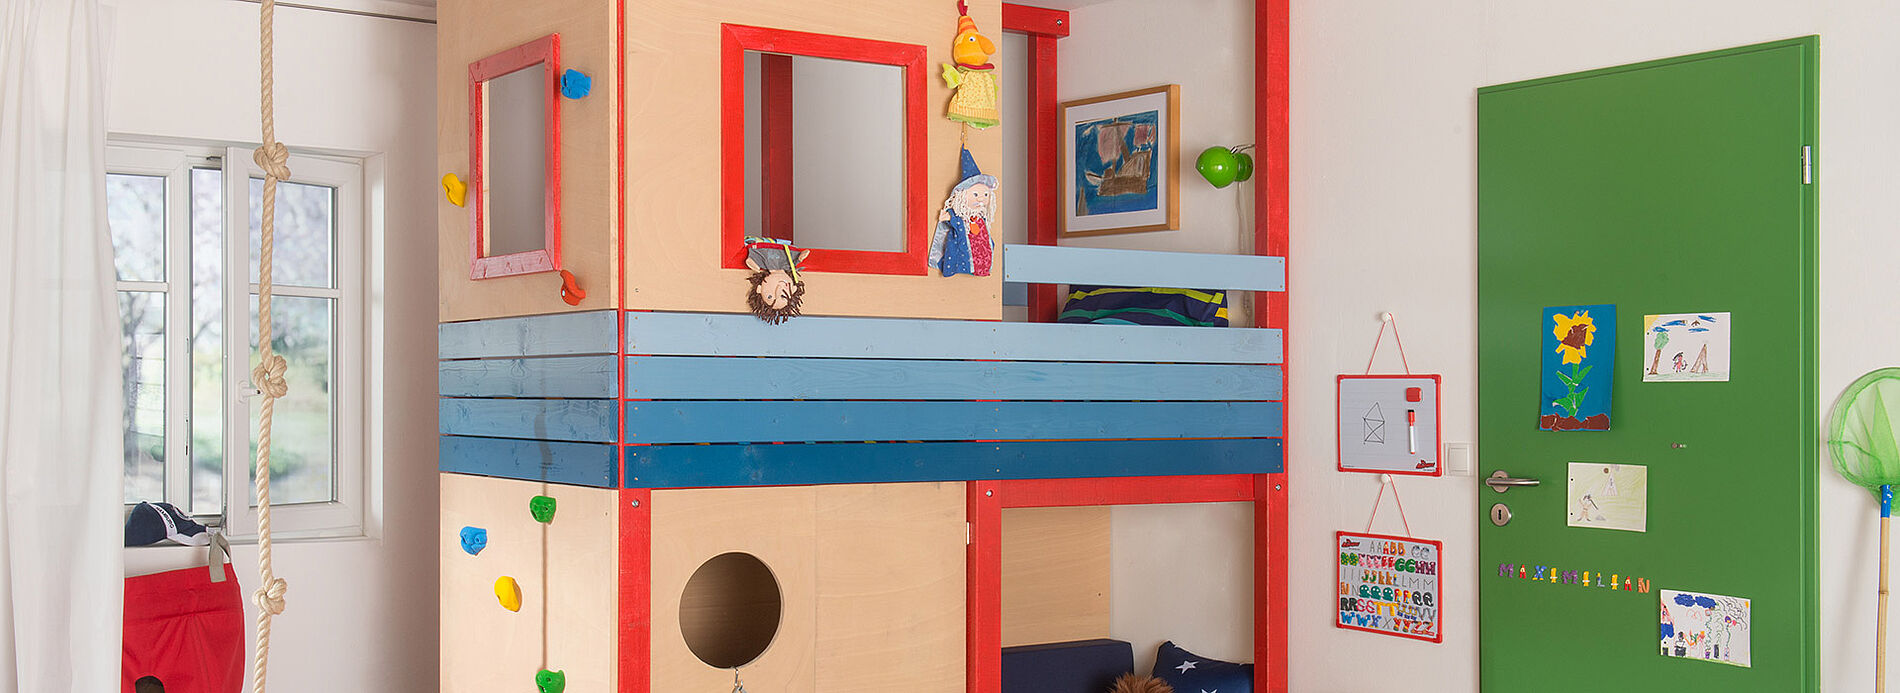
What child has not dreamt of this - his or her very own loft bed. From sleeping to playing or climbing - this guide shows you how to very quickly turn this dream into reality for your child. As well as looking good, loft beds are also extremely practical. The space under the bed surface can be used for playing or snuggling up and it also provides extra storage space for toys, bed linen and much more.

  • Paint sprayer for paints and varnishes, e.g. Universal Sprayer W 590 FLEXiO
  • Cordless screwdriver
  • Drilling machine
  • Jigsaw
  • Grinding machine
  • Maybe electric tacker
  • Screw clamps
  • Angle ruler
  • Spacers (approx. 2mm)

Base frame

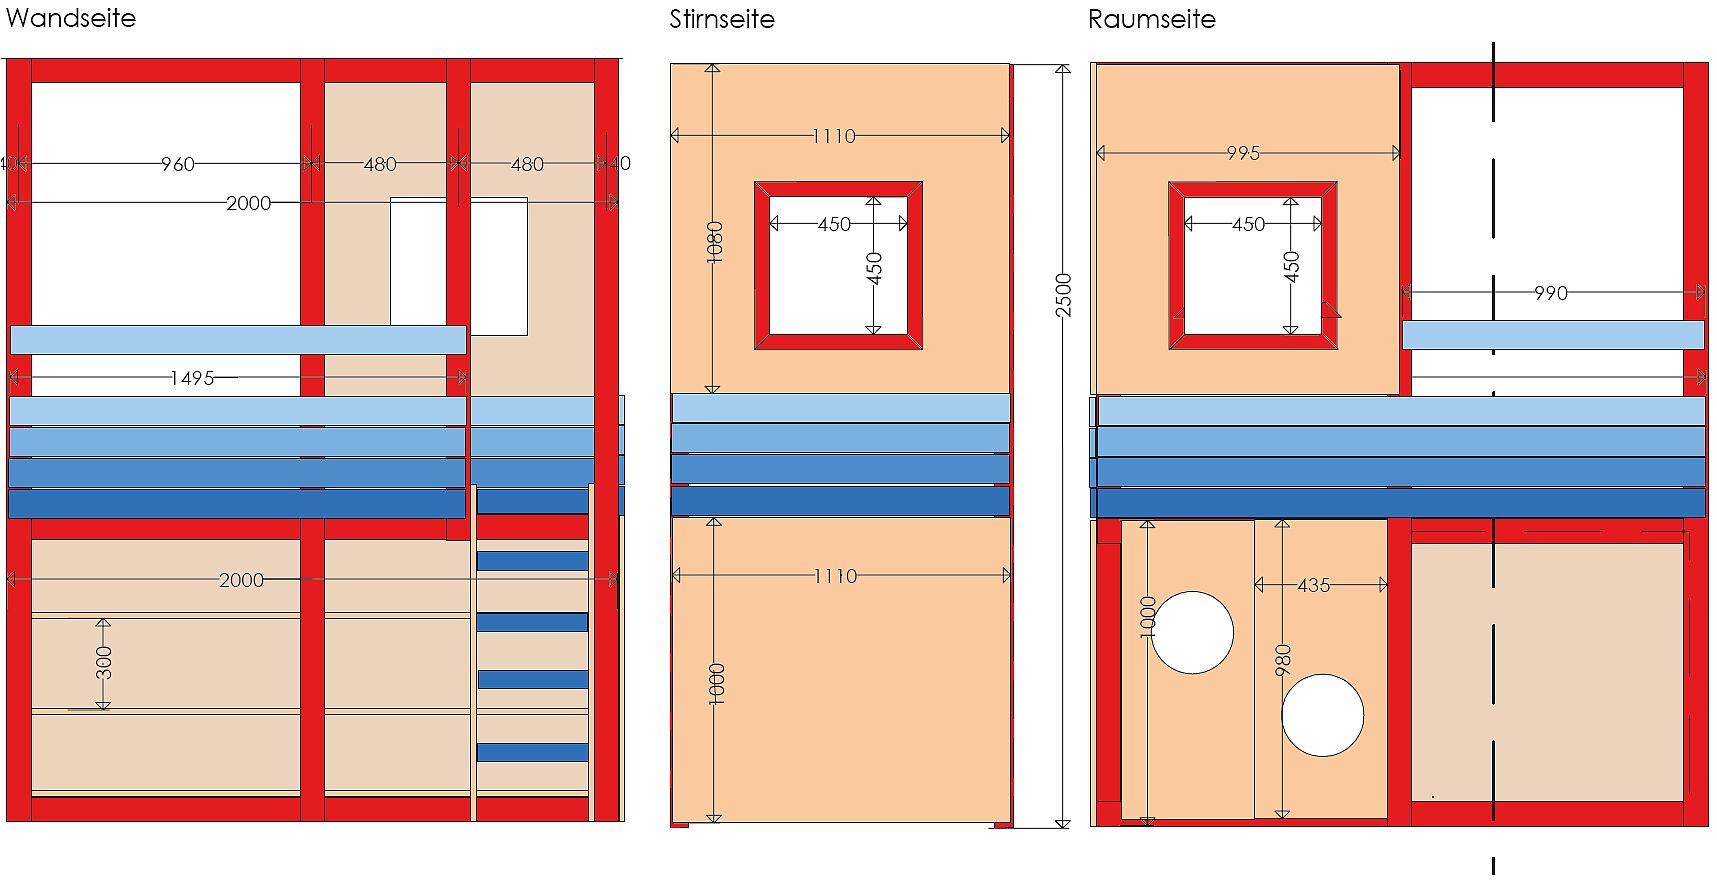
  • 6 Longitudinal timber 2000 x 60 x 80 mm Construction solid pinewood
  • 6 4-legs 2500 x 60 x 80 mm Construction solid pinewood (length depending on room height)
  • 1 Ladder fastening on the left 1580 x 60 x 80 mm Construction solid pinewood (Distance from outer stand 400 mm)


Plates

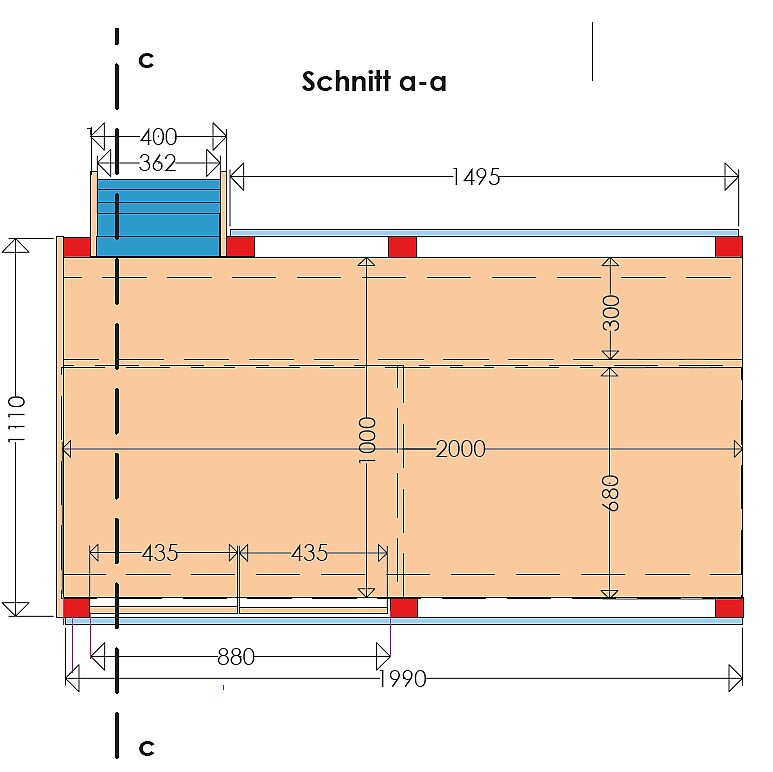
  • 1 Intermediate base plate 2000 x 1000 x 19 mm Hardwood plywood (Notch the front corners in the beam thickness)
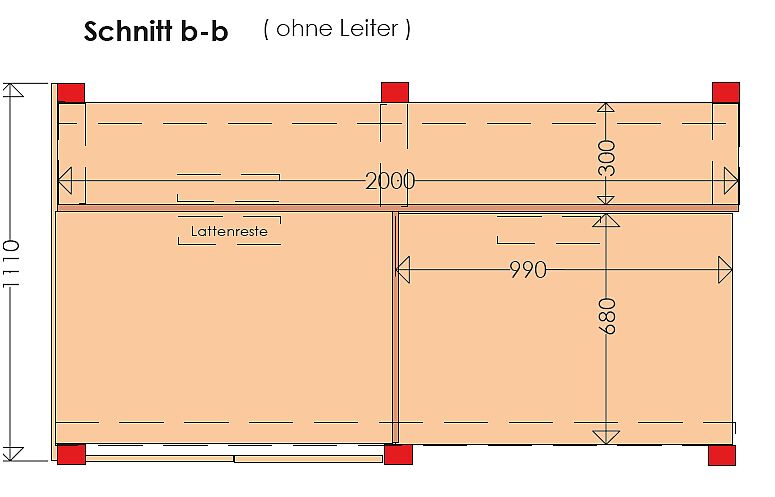
  • 1 Dividing wall 680 x 1000 x 19 mm Hardwood plywood
  • 1 Partition wall 2000 x 1000 x 19 mm Hardwood plywood
  • 3 Shelves 2000 x 300 x 19 mm Hardwood plywood
  • 2 Doors 980 x 435 x 19 mm Hardwood plywood (Round cut-outs diameter approx. 270 mm)
  • 1 Top window plate 1000 x 1080 x 19 mm Hardwood plywood (Window cut-out 450 x 450 mm)
  • 1 Front side bottom 1000 x 1110 x 19 mm Hardwood plywood
  • 1 Front side top 1080 x 1110 x 19 mm Hardwood plywood (Window cut-out 450 x 450 mm)
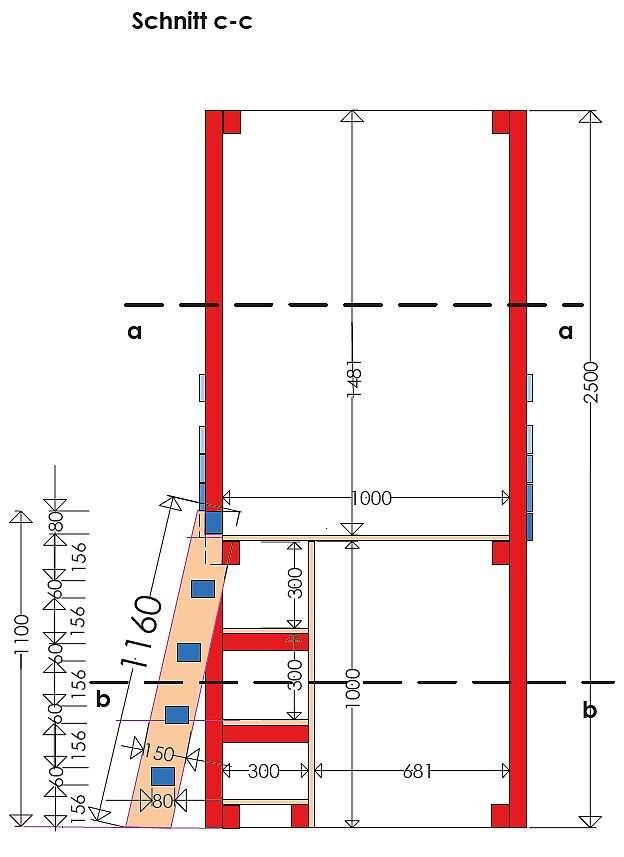
  • 2 Step side panels 1160 x 150 x 19 mm Hardwood plywood (Determine the angle locally and cut to size)
  • 8 Window frames 550 x 50 x 19 mm Hardwood plywood (Cross-cut ends at 45°)


Boards

  • 4 Smooth-edge boards 1990 x 21 x 95 mm (Room side)
  • 1 Smooth-edge boards 990 x 21 x 95 mm (Room side)
  • 4 Smooth-edge boards 1110 x 21 x 95 mm (Front side)
  • 5 Smooth-edge boards 1495 x 21 x 95 mm (Wall side)


Square timber

  • 6 Top and middle shelf supports 300 x 60 x 80 mm Construction solid fir wood
  • 5 Stairs 362 x 60 x 80 mm Construction solid fir wood
  • 3 Remaining pieces as shelf support bottom 60 x 80 mm Construction solid fir wood
  • 2 Sections for securing the cabinet internal wall e.g. approx. 100 x 20 x 20 mm square strip


Misscellaneous

  • 20 Machine screws M8-110 (Connection of the base frame)
  • 40 Washers M 8 (Connection of the base frame)
  • 20 Nuts M 8 (Connection of the base frame)
  • Various wood screws
  • 2 Right-hand hinges 50 x 40 mm (here Hettich Art.-Nr. 00365)
  • 2 Left-hand hinges 50 x 40 mm (here Hettich Art.-Nr. 00365)
  • Multi-purpose primer
  • Semi-matt paint, Lipstick shade, ready-mixed
  • Semi-matt paint shades from “Experience colours - Seas & Oceans” colours 237 to 240 mixed
  • Wood paint in shade 10.16
  • Various tacker staples or nails

Sketch 1

Sketch 2

Sketch 4

Sketch 3

Step-by-step guide for building a bunk bed

Step 1 of 15: Getting ready

Getting ready

Purchase the materials from the enclosed list. For the base construction, you will need 60 x 80 mm construction timber as well as 19 mm-thick hardwood. To equip the upper level with a 1000 x 2000 mm mattress, the external dimensions of the base construction are 2000 (L) x 1120 (W). For the overall height, use the height of the room to guide you and the playing and sleeping level is set at a height of 1000 mm.

The beams for the base construction are connected with screws, washers and nuts.

Step 2 of 15: Building the base frame

Building the base frame

Drill the two base frames (wall side and room side) according to the dimensional sketch attached. The quickest way to do this is to lay the beams of the base frames on top of each other and align them at right-angles.

Top Tip: Support the beams so that you do not drill through the floor too. The wall side requires an additional upright to secure the ladder. Then enlarge the two hole ends to countersink the U-washer with a screw head or nut (Right image).

Building the base frame

Drill the two base frames (wall side and room side) according to the dimensional sketch attached. The quickest way to do this is to lay the beams of the base frames on top of each other and align them at right-angles.

Top Tip: Support the beams so that you do not drill through the floor too. The wall side requires an additional upright to secure the ladder. Then enlarge the two hole ends to countersink the U-washer with a screw head or nut (Right image).

Step 3 of 15: Priming and painting the base frame

Priming and painting the base frame

Before coating, the surfaces are sanded. The primer can be applied using a WAGNER spray system. Dilute the primer with water according to the manufacturer's instructions. Spray the shorter wooden strips keeping a consistent distance. Only change the direction of spray outside the wooden strips. This avoids a build-up of thicker layers of paint during direction changes. The primer prevents water based paint or wood stains from breaking through.

Once the primer has dried, the base frame can be painted quickly and efficiently using a WAGNER paint spray system. We recommend applying the paint in two coats. Sand the surface between coats to ensure that the paint adheres well.

Step 4 of 15: Assembling the base frame

Assembling the base frame

Once the paint has dried, place the two base frames back on top of each other and connect them using screws, washers and nuts (Left image). The intermediate base plate is connected with the side pieces by screwing it onto the cross-beam (Right image).

Assembling the base frame

Once the paint has dried, place the two base frames back on top of each other and connect them using screws, washers and nuts (Left image). The intermediate base plate is connected with the side pieces by screwing it onto the cross-beam (Right image).

Step 5 of 15: Attaching the base construction

Attaching the base construction

Using a spirit level, align the base construction and secure it to the ceiling as well as the wall with wall plugs and screws. The holes for inserting the wall plugs can be drilled using a hammer drill.

Attaching the base construction

Using a spirit level, align the base construction and secure it to the ceiling as well as the wall with wall plugs and screws. The holes for inserting the wall plugs can be drilled using a hammer drill.

Step 6 of 15: Painting the strips

Painting the strips

Pour paint into the WAGNER paint sprayer container and dilute it with water in accordance with the manufacturer’s instructions (Left image). Connect the spray attachment and carry out a test spray on a piece of cardboard or spare wood. Paint the strips with an even application of paint in the desired colour (Right image).

Step 7 of 15: Attaching the strips

Attaching the strips

Screw on the pre-painted strips to the wall, room and front side, once they have dried (Left image). To ensure an even distance use spacers (approx. 2mm) (Right image).

Attaching the strips

Screw on the pre-painted strips to the wall, room and front side, once they have dried (Left image). To ensure an even distance use spacers (approx. 2mm) (Right image).

Step 8 of 15: Cut-out window to size

Cut-out window to size

Draw in the outline with a pencil and cut out the shape with a jigsaw (Left image). Use sander to round off any edges (Right image).

Cut-out window to size

Draw in the outline with a pencil and cut out the shape with a jigsaw (Left image). Use sander to round off any edges (Right image).

Step 9 of 15: Cut out the port holes to size

Cut out the port holes to size

Using a plate, draw on the outline for the port holes (Left image). Round off the edges again afterwards (Right image).

Cut out the port holes to size

Using a plate, draw on the outline for the port holes (Left image). Round off the edges again afterwards (Right image).

Step 10 of 15: Painting the window frame

Painting the window frame

First spray the mitre-cut window frames with an undercoat and then spray with paint (in the same colour as the base construction). Attach the mitre-cut strips for the window frame. The easiest option is to affix the window using an electric nailer.

Step 11 of 15: Spraying doors with wood paint

Spraying doors with wood paint

Dilute the wood paint as per the manufacturer's instructions (Left image) and using a WAGNER paint spray system spray it onto the doors (Right image).

Spraying doors with wood paint

Dilute the wood paint as per the manufacturer's instructions (Left image) and using a WAGNER paint spray system spray it onto the doors (Right image).

Step 12 of 15: Attaching the doors

Attaching the doors

To attach the doors, a pair of furniture hinges should be screwed into place on the right and left doors and then screwed to the base construction.

Step 13 of 15: Building shelves

Building shelves

Screw on shelf supports for the upper and middle shelves to the base construction and middle wall (Left image), with the middle wall being secured in place at the same time. Then insert the shelves. Secure the wall support between between the shelves and the relaxing area to the strip sections.

Step 14 of 15: Attaching the steps

Attaching the steps

Secure steps between the two side panels with clamps (Left image). The angle of the steps is determined and then aligned with a carpenters square. Secure the steps through the side panels using two screws each. Affix the finished steps to the base construction using two screws (Right image).

Step 15 of 15: Attaching climbing handles

Attaching climbing handles

Secure large climbing handles with 10x screws and pronged tee nut, with small roundhead screws.

The result: an individual bunk bed

Mehr Projekte

WAGNER Group W 590 Produktbild

W 590 FLEXiO

The flexible hand sprayer for indoor and outdoor use

W 590 FLEXiO
Produktfinder

WAGNER product finder

Here you can find more products

Go to products
Spraying varnishes: Instructions & tips

Spraying varnishes: Instructions & tips

Learn here how best to proceed when spraying varnish, what you should look out for, why it's worth spraying varnishes and what the best equipment is for it.

Spraying varnishes